
When we bought this house I knew the projects I had in mind would be time consuming… add a pandemic aka quarantine with longer shipping times to the equation and it takes EVEN longer. But I am happy to report that our randomly oversized “powder room” off the TV room is finally finished! Like any DIY project we hit bumps in the road and unexpected issues but nothing we couldn’t handle or had to hire someone for.
Where we started…


I knew we didn’t have the budget for a complete remodel/renovation so I had to get creative. Our first step was having our contractor paint the walls and baseboards white and move one of the light fixtures over further because we knew we wanted a bigger mirror. Then we basically used it as a work bench for a couple months.
The only changes we made right before Steve’s 30th birthday party we hosted at the house in January was paint the powder room door white (use kilz primer as your first coat under any paint color you want) and used this matte black spray paint on the light fixtures.


Right after my sister got to town the pandemic hit so we gained a handy roommate who loves DIY projects! So we decided to work on the powder room. Below are each project in the order we knocked them out!
First up…Staining the Cherry Wood Cabinets
We started by staining the cabinets with this black gel stain and the items listed below. I recommend taping off the areas around the piece you are staining, sanding the surface lightly, wipe down with a damp cloth to remove all residue, apply light coats of the gel stain and finish with polyurethane to seal it all in.


Painting the Gold Shower
Spray painting the gold shower frame black was supposed to be the easiest part of this project…but man were we wrong. I have used spray paint for many projects and I’ve NEVER had this happen (i.e. our fireplace). We covered the glass doors and surrounding walls with plastic and frog tape. Allison stood inside the shower while holding a piece of cardboard to shield any spray paint dust from getting inside the shower. I’m not kidding when I say it got EVERYWHERE… it was all over the powder room and TV ROOM. We made sure we got an indoor spray paint but it clearly was a defective bottle because it leaked the whole time as well. Safe to say I won’t be using this specific spray again due to the trauma of wiping it off my brand new sectional. NO THANKS.


Painting Tile Counter & Floor
This was the most asked about project…and the most concerning for some. The only reason I was comfortable painting tile was because this is a low traffic area of the house. I strongly dislike our kitchen tile BUT I would never paint it because it’s at higher risk of chips, getting worn out, etc.
How to paint tile:
- CLEAN – we used Krud Kutter to get any residue off the tiles and then follow up with vacuuming
- TAPE – tape off baseboards, walls, cabinets, etc. with frog tape
- PRIME – we used this heavy duty concrete bonding primer that dries clear
-
PAINT – we did 3 layers of this ultra white tile paint
- let it dry between coats for recommended time found on the back of the can
- let your 3rd coat dry for a full 48 hours before walking on it and sealing it
- NOTE: for the 3rd coat on the floor we decided to use a less stark white to give the room a little warmth. We used this Benjamin Moore floor & patio paint in the color Swiss Coffee.
-
SEAL – we used this water based Varathane Polyurthane in crystal clear gloss to give the tiles a nice gloss sheen to give it the appearance of real tile
- do a minimum of 3 coats with the recommended dry time between coats found on the back of the can
Note – doing a stencil is such a fun option! We bought this one from Etsy but decided it wouldn’t turn out because the tile sizes we were working with weren’t consistent (see images below).


Hanging Wallpaper
If you’ve ever hung wallpaper on a wall that has a faucet and two light fixtures… you are a champ. This was so much harder than I thought it was going to be. So thankful to have had my sister around for this one otherwise it probably wouldn’t have gone up. I have no advise other than…be patient and find a good “how to” youtube video. If you have no obstacles it should be pretty easy.
I ordered this hexagon wallpaper from Amazon.

Installing New Sink
We got lucky with installing the new sink because all the pipes were the right length and fit together nicely. The only hiccup we had was the size of the hole in the tile counter – we had to order this diamond hole saw drill bit to make the hole bigger for the new sink drain.

Sanding & Repainting Baseboards
This was a very annoying and unexpected surprise since we had our contractor paint the baseboards. It was clear that they did not prep correctly because the paint started to peel off as we pulled the tape away from it afer we painted the floor. We had to scrape and sand down the baseboards and repaint them. While we were at it we caulked the tops and bottoms of the baseboards to fill in the gaps. FUN TIMES.

Small Touches
Removing hand towel holder: Nothing special to note here, just removed it since I wanted a standing towel holder. Filled the holes with spackling and sanded before painting the wall.
Replacing toilet paper holder: The original one was outdated and broken, so we replaced it with this gold one! Easy and inexpensive update!
Spray painting floor vent: I couldn’t find the right size floor vent at Home Depot so I decided to spray paint it black with what I had leftover from the shower painting project (did this outside to avoid another disaster).


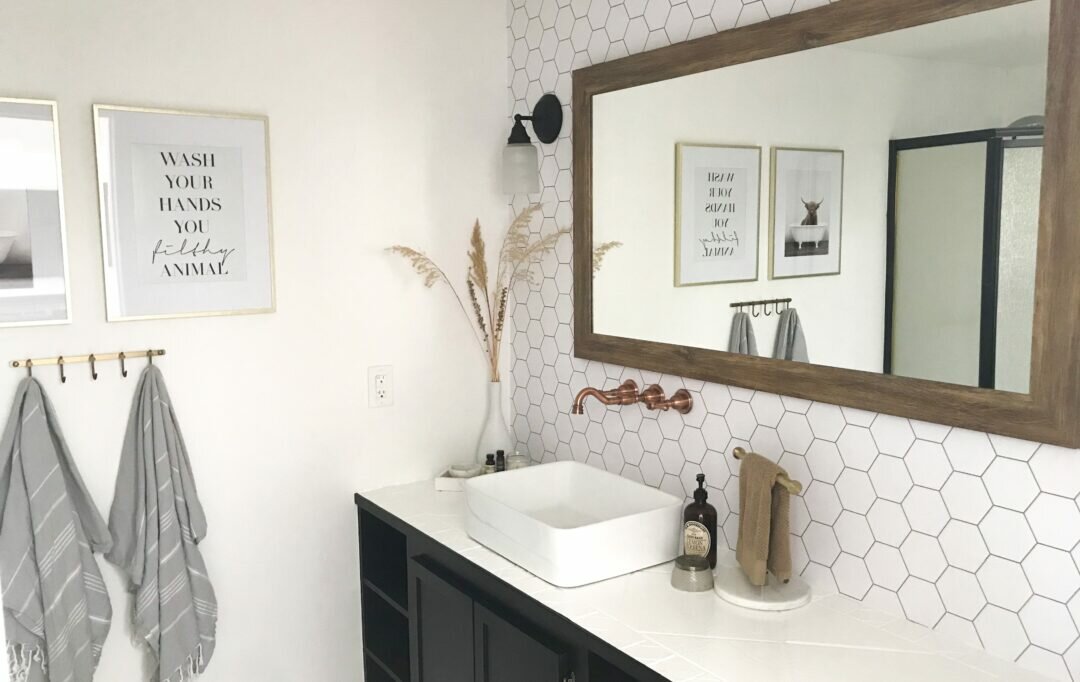
Lastly – Final Decorating Touches!
We finished off the powder room with the fun decor touches listed below!
- tp basket
- frames
- cow in a tub print
- wash your hands you filthy animal print
- wall towel hooks
- turkish towels
- hand towel stand
- hand towel
- vase – from goodwill! grass is from my front yard
- marble bowl
- marble tray
- accent table (I got this table from HomeGoods for our TV room but it didn’t match the other woods so I popped it in the bathroom! Similar one linked.)
- rug (3’6″ x 5’6″)
- mirror – the price has gone up since we got it (paid $300)


To see a full virtual tour check out my IG story! And if you have any questions leave them in the comments below!

No Comments